The following is a collection of articles, videos, and notes on Microservices. The Microservices architecture is a variant of the service-oriented architecture (SOA), a collection of loosely coupled services.
Advanced Platform Development with Kubernetes
What You'll Learn
- Build data pipelines with MQTT, NiFi, Logstash, MinIO, Hive, Presto, Kafka and Elasticsearch
- Leverage Serverless ETL with OpenFaaS
- Explore Blockchain networking with Ethereum
- Support a multi-tenant Data Science platform with JupyterHub, MLflow and Seldon Core
- Build a Multi-cloud, Hybrid cluster, securely bridging on-premise and cloud-based Kubernetes nodes
Articles
- Background concept - “Open Data: Small Pieces Loosely Joined”, Tim O’Reilly
- Modern software design problems and solutions - “12-Fractured Apps”, Kelsey Hightower (SysAdmin @ Google)
- 12-Factor Defined - “The 12-Factor App”, Adam Wiggins
- Pros and Cons of Microservices - “Microservices” and Microservice Trade-Offs, Martin Fowler
- “What are containers and why do you need them?" - CIO
- “Containers bring a skinny new world of virtualization to Linux” - ITWorld
Videos
- “Microservices”, Martin Fowler
- “The Evolution of Microservices”, Martin Fowler
- “The State of the Art in Microservices” with Docker, Adrian Cockroft
Notes
Key Goals of Microservices
- Rapid development
- Continuous deployment
Best Practices
- Version Control - All code and configuration should be versioned.
- Log to Standard Out - This unifies the log collection process.
- Package Dependencies - Ensure the stability of the build process.
Twelve-Factor Principles
- Portable - Service (container) should be able to be run anywhere.
- Continually Deployable - Able to deploy any time without disruption.
- Scalable - Multiple copies should be able to run concurrently (stateless)
JSON Web Tokens (JWT) - Client -> Server trust.
- Compact, self-contained method for transferring secure data as a JSON object.
- Use for Authentication and Information Exchange
- See https://jwt.io/
- A server creates a token, and the client uses token to make requests.
Containers - Docker
- Docker is simply an API on top of existing process isolation technology.
- Independent packages
- Namespace Isolation
Alpine Linux
Alpine Linux Small. Simple. Secure. Alpine Linux is a security-oriented, lightweight Linux distribution based on musl libc and busybox.
- Alpine container image
- Docker gets minimalist with plan to migrate images to Alpine Linux
- Solomon Hykes, founder and CTO of Docker (on the move to Alpine)
We can demonstrate using an Alpine Linux container by executing the echo command included with Alpine: docker run --rm alpine echo "hello". This command pulls the Alpine container if you don’t already have it. Since the echo command completes after echoing its message, there is nothing else to do and the container ceases execution and remains in a stopped state. However, the --rm flag removes the container after it runs, this means you won’t end up with a bunch of useless stopped containers after running it multiple times.
Kubernetes
I use Minikube to play with and test helm on my mac laptop. Minikube is a great way to learn and experiment with Kubernetes without disrupting a production cluster, or having to setup a custom cluster in your datacenter or in the cloud.
Minikube
In order to follow the examples below you will need to Install Minikube and it’s dependencies. The command kubectl is used to interact with the kubernetes cluster.
- Version:
minikube version
minikube version: v0.25.2
- Status:
minikube status
minikube: Stopped
cluster:
kubectl:
- Start:
minikube start
Starting local Kubernetes v1.9.4 cluster...
Starting VM...
Getting VM IP address...
Moving files into cluster...
Downloading localkube binary
 163.02 MB / 163.02 MB [============================================] 100.00% 0s
 0 B / 65 B [----------------------------------------------------------]   0.00%
 65 B / 65 B [======================================================] 100.00% 0sSetting up certs...
Connecting to cluster...
Setting up kubeconfig...
Starting cluster components...
Kubectl is now configured to use the cluster.
Loading cached images from config file.
- Addons:
minikube addons list - Enable Heapster:
minikube addons enable heapsterto provide CPU and memory usage in the dashboard.
heapster was successfully enabled
- Dashboard:
minikube dashboard - Kubernetes cluster status:
kubectl cluster-info - Kubernetes nodes in the cluster:
kubectl get nodes
Kubernetes: Using Kubernetes
Deployments keep containers running in Pods, even when nodes fail. Create a simple deployment, in this case using the cjimti/go-ok container:
kubectl run go-ok --image=cjimti/go-ok
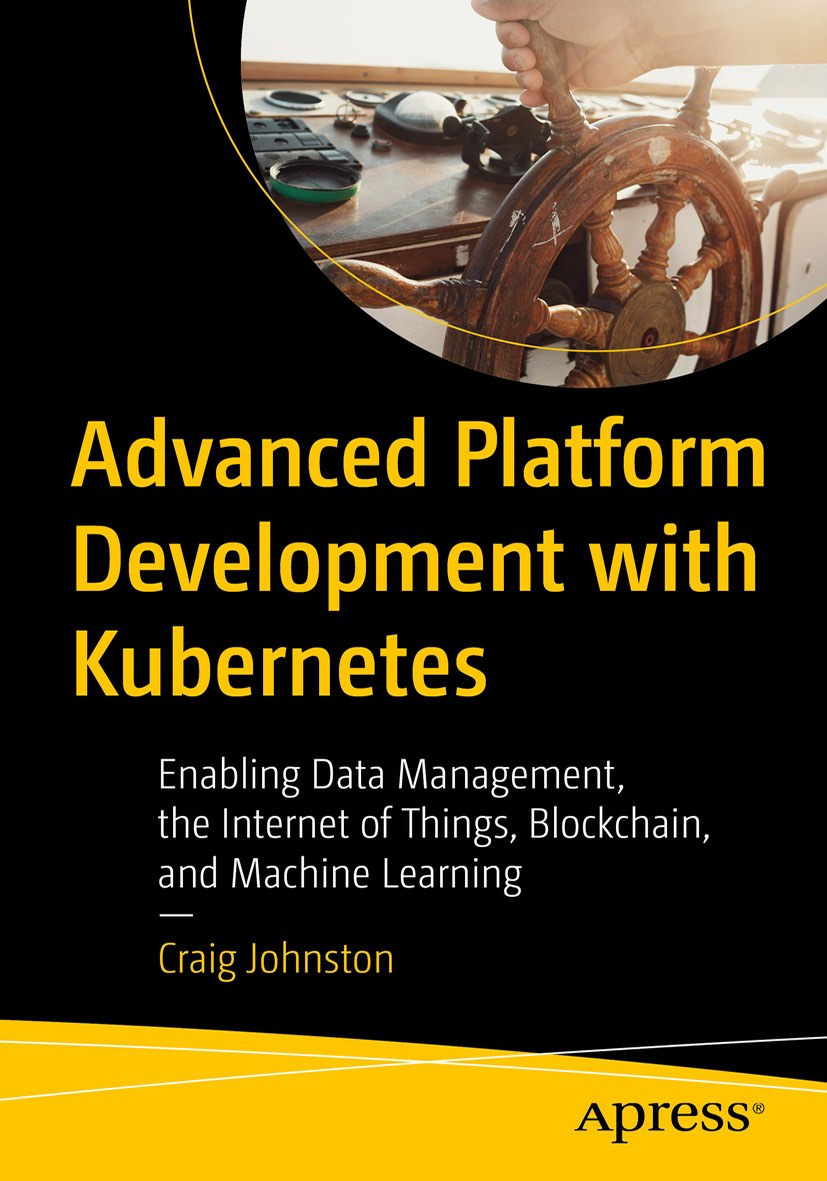
The kubectl run command gave us a Deployment, Pod and Replica Set to support our go-ok container.
In the Dashboard you can see the running deployment, pod and replica set. Run minikube dashboard to bring it up in a web browser.
Deployments
List the deployments in the cluster (default namespace):
kubectl get deployments
NAME      DESIRED   CURRENT   UP-TO-DATE   AVAILABLE   AGE
go-ok     1         1         1            1           2m
Get the yaml configuration of the deployment
kubectl get deployment -o yaml
Pods
List all pods on the cluster (default namespace):
kubectl get pods
NAME                     READY     STATUS    RESTARTS   AGE
go-ok-5bc6b8bf6c-sltjk   1/1       Running   0          12m
Get the yaml configuration of the Pod:
kubectl get pod go-ok-5bc6b8bf6c-sltjk -o yaml
Replica Sets
While ReplicaSets can be used independently, today it’s mainly used by Deployments as a mechanism to orchestrate pod creation, deletion and updates. When you use Deployments you don’t have to worry about managing the ReplicaSets that they create. Deployments own and manage their ReplicaSets.
List all Replica Sets in the cluster (default namespace):
kubectl get rs
NAME               DESIRED   CURRENT   READY     AGE
go-ok-5bc6b8bf6c   1         1         1         20m
Get the yaml configuration of the Replica Set:
kubectl get rs go-ok-5bc6b8bf6c -o yaml
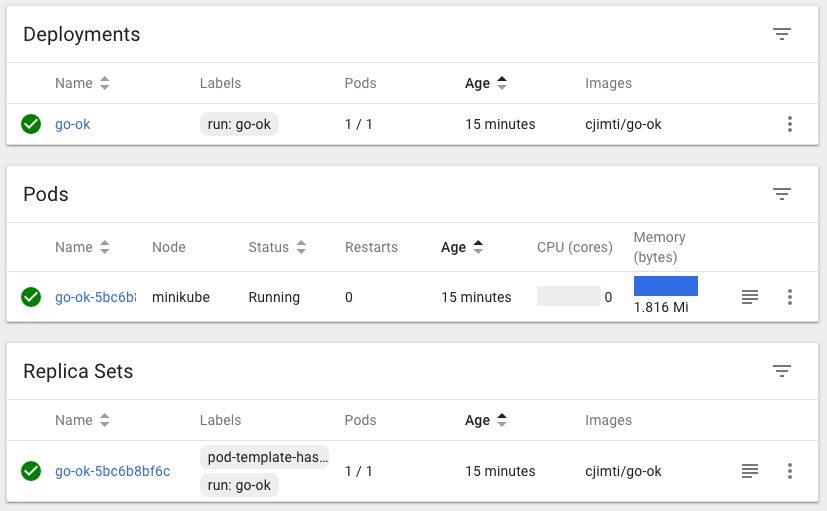
Expose A Container Services
We expose the container with the following:
kubectl expose deployments go-ok --port 8080 --type NodePort
kubectl get services
Use the type NodePort with Minikube. Since we are not on a cloud provider and so unable to use the LoadBalancer type.
If you set the type field to “NodePort”, the Kubernetes master will allocate a port from a flag-configured range (default: 30000-32767), and each Node will proxy that port (the same port number on every Node) into your Service.
The go-ok container listens on it’s own port 8080. We ask kubernetes to assign a random port number that will route to a running go-ok container to it’s port 8080.
List all the services on the cluster (default namespace):
kubectl get services
NAME         TYPE        CLUSTER-IP       EXTERNAL-IP   PORT(S)          AGE
go-ok        NodePort    10.110.158.111   <none>        8080:32414/TCP   3m
kubernetes   ClusterIP   10.96.0.1        <none>        443/TCP          24d
The go-ok services is now running on port 32414 as is seen in the PORT(S) column: 8080:32414/TCP
Get the yaml configuration of the service:
kubectl get service go-ok -o yaml
The service is now viewable in the Dashboard:
Architecture Overview: Deployments
Deployments contain ReplicaSets which contain Pods and Services. A good visual illustration of this is in the Dashboard:
Deployment Details
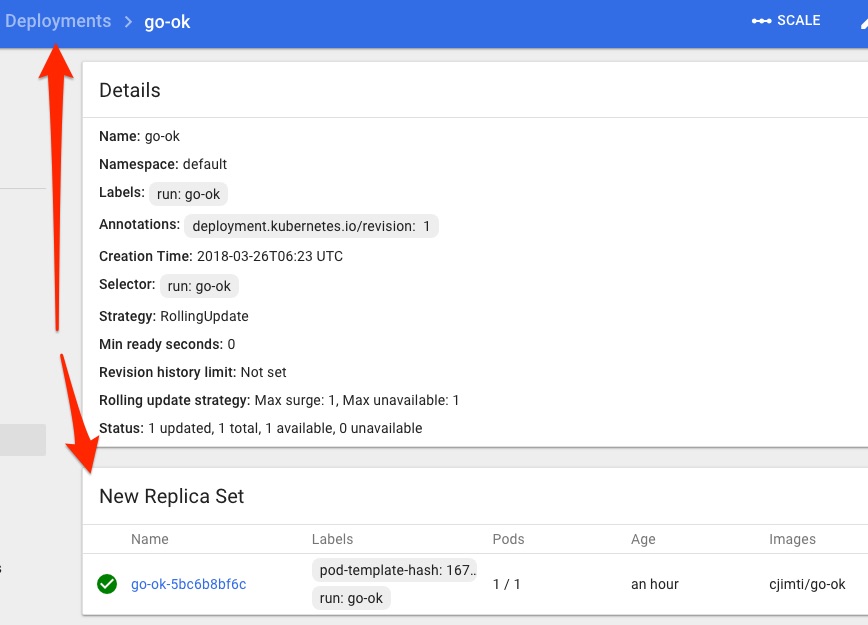
Replica Set Details

More on Pods
A Pod represent a Logical Application. An example application would be some API service or backend webserver and an nginx container, these would run together on a Pod.
Pods:
- One ore more containers and volumes
- Shared namespaces
- One IP per pod
Manually port forward to a container (on the local network interface):
kubectl port-forward go-ok-5bc6b8bf6c-sltjk 10080:8080
Secrets & Config Maps
Creating a Secret.
kubectl create secret generic tls-certs --from-file=tls
kubectl describe secrets tls-certs
Creating a Config Map.
kubctl create configmap nginx-proxy-conf --from-file nginx/proxy.conf
kubectp describe configmap nginx-proxy-conf
Declare a Pod
Create a pod.yml:
apiVersion: v1
kind: Pod
metadata:
  name: go-ok
  labels:
    app: go-ok-app
    purpose: example
spec:
  containers:
    - name: go-ok
      image: cjimti/go-ok:v1
      imagePullPolicy: Always
      env:
        - name: PORT
          value: "80"
        - name: GIN_MODE
          value: "release"
      ports:
        - name: http
          containerPort: 80
Create the Pod:
kubectl create -f ./pod.yml
Get a list of Pods using a label selectors:
kubectl get pods -l app=go-ok-app
or
kubectl get pods -l app=go-ok-app,purpose=example
``plain NAME READY STATUS RESTARTS AGE go-ok 1/1 Running 0 3m
Add a label to a running [Pod]:
```bash
kubectl label pods go-ok owner=cjimti
Delete the pod created from pod.yaml as easily as creating it with:
kubectl delete -f pod.yml
Re-create the Pod if you are following along.
Services
Services are persisten endpoints for Pods.
Create a Service using a Selector:
service.yml:
apiVersion: v1
kind: Service
metadata:
  name: "go-ok"
spec:
  selector:
    app: "go-ok"
    purpose: "example"
  ports:
    - protocol: "TCP"
      port: 80
      targetPort: 80
      nodePort: 31000 //port exposed on the node (cluster)
  type: NodePort
List the service created with the config:
kubectl get -f service.yml
Ingress Controller
Exposing external traffic to our service is done through an Ingress controller. Check out Setting up Nginx Ingress on Kubernetes for a detailed how-to and also a good write up on Ingress itself on Medium: Kubernetes Ingress
Traditionally, you would create a LoadBalancer service for each public system you want to expose. This can get rather expensive. Ingress gives you a way to route requests to services based on the request host or path, centralizing a number of services into a single entrypoint. –Kubernetes Ingress
Since I am using Minikube on my local workstation I am going to add the domain local.imti.cloud to my /etc/hosts file and resolve it to the Minikube IP.
Get the Minikube IP:
minikube status
minikube: Running
cluster: Running
kubectl: Correctly Configured: pointing to minikube-vm at 192.168.99.100
My /etc/hosts' entry should be 192.168.99.100 local.imti.cloud`. Browsing to http://local.imti.cloud:30000/ will now give me the dashboard for my Minikube cluster.
Ingress Resources
- Official Kubernetes Ingress Documentation
- Setting up Nginx Ingress on Kubernetes
- Pain(less) NGINX Ingress
- Kubernetes nginx-ingress-controller
Port Forwarding / Local Development
Check out kubefwd for a simple command line utility that bulk forwards services of one or more namespaces to your local workstation.
This blog post, titled: "Microservices & Kubernetes: Overview" by Craig Johnston, is licensed under a Creative Commons Attribution 4.0 International License.

SUPPORT
Order my new Kubernetes book: Advanced Platform Development with Kubernetes: Enabling Data Management, the Internet of Things, Blockchain, and Machine Learning